Easy DIY Plaster Fireplace With Electric Insert

An easy way to build a DIY plaster fireplace on a small budget using an electric fireplace insert and Venetian Glaze plaster paint.
Have you ever wished, hoped, and dreamed for years that a home improvement project would happen on a particular area of your home? For me, one of those project dreams was a porch fireplace.

Our back porch had this one beadboard wall section jutted between our brick that once held a mini fridge and TV. But it seemed like the absolute perfect spot for a fireplace, don’t you think?

We finally set out to make it a reality with this DIY plaster fireplace using an electric insert and plaster paint to make the entire process easy.
If you’re a beginner carpenter, this project is a great one to try.
Collectively, it takes about a week and totaling around $1,300 for a fully functional working fireplace.

What is Venetian Plaster?
Traditional Venetian plaster is composed of eco-friendly lime and marble dust creating a 3-dimensional effect with lustrous movement. Applying Venetian plaster requires quite a bit of practice.
As an alternative to help our limited knowledge in plaster, Romabio supplied Venetian Glaze to us. It’s a plaster paint made of Italian slaked lime to save time and remove some of the guesswork. The end result creates movement with a plaster look when applied with a trowel.
It’s a good idea to practice on scrap drywall before using it, but it doesn’t have nearly as much of a learning curve as real plaster.

DIY Electric Fireplace with Plaster Paint
I pulled inspiration from many DIY fireplace ideas, but ultimately we landed on this simple design with a beautiful DIY fireplace surround inspired by Chelsey Freng and Angela Rose.
I’ll share their tutorials for the surround toward the bottom of this post, but the basics of building an easy DIY fireplace frame is fairly straightforward to allow all kinds of different styles in the finishing work.

Supplies
- Electric fireplace insert (We are so impressed with this one that looks so real and is budget-friendly.)
- 16 2x4s
- 3 inch deck screws
- 4 sheets of moisture-resistant purple drywall (We chose this for the damp rated area on our porch; standard drywall is fine indoors.)
- Utility knife
- Drywall screws
- Drywall mesh tape
- Corner bead
- Joint compound
- Trowel
- 100 grit sanding pads
- Romabio Microgrip Primer
- Drop cloth
- Painters tape
- Paint tray
- Paint roller with covers
- Mixer drill bit
- Rags
- Romabio Venetian Glaze
- Large paint brush
- Romabio Clear Matte Top Coat
- Brad nails
Tools
- Drill
- Miter saw
- Rotary saw (optional but helpful)
- Orbital sander
- Brad nailer
Steps

Step 1 – Build the Sides of the Fireplace Frame
Write down the measurements of the area where you plan to put your fireplace. Use your electric insert as a guide to determine the depth and width you need for your fireplace frame.
Make a frame for one of the sides using 2x4s (pictured above) secured with 3-inch deck screws.


Step 2 – Frame the Header and Footer
Decide on the height you want for your electric insert to determine the height of your footer securing together more 2x4s with deck screws. Build an identical sized footer parallel to the first one you installed to use as a platform for the firebox insert later.
Attach two parallel 2×4 boards long the top of the fireplace frame as a header.

Step 3 – Frame the Electric Insert
Use your electric insert as your guide to determine the size of the opening you will need for this step. Build a frame for those dimensions screwing more 2x4s into the existing frame.

Step 4 – Finish the Fireplace Frame
Finish the rest of the framing with 2x4s built on top of the insert section to the ceiling. These will act as bracing for the drywall next.

Step 5 – Hang Drywall
Use a utility knife to cut the drywall sheets and attach them to the fireplace frame with drywall screws.
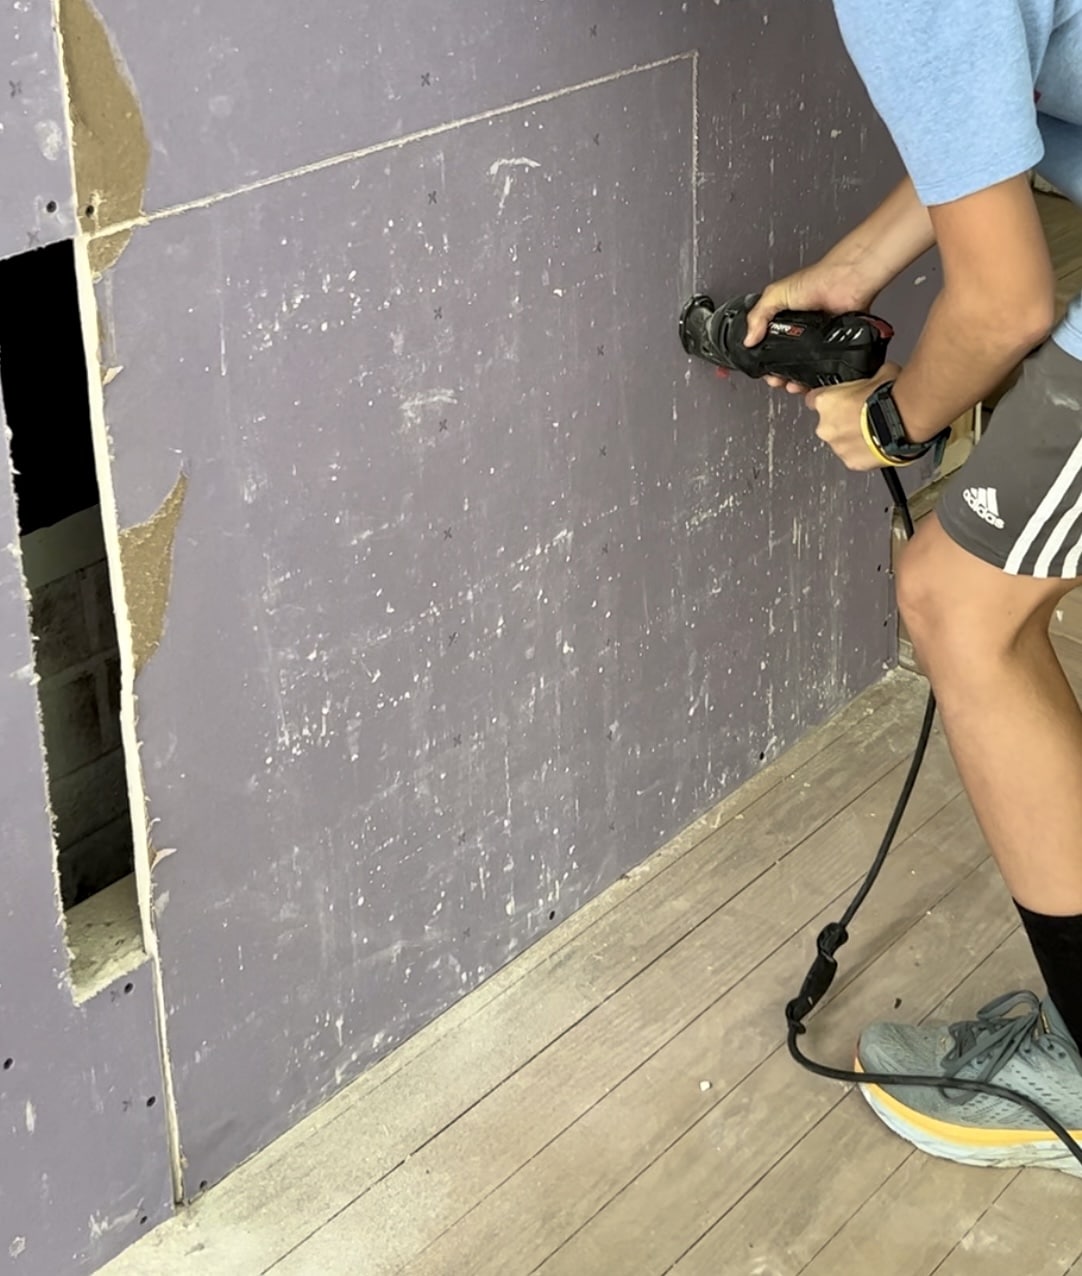
Step 6 – Cut Out Insert Section
Use a utility knife or rotary saw to cut out the section of drywall for the fireplace insert. A utility knife does just fine for this, but the rotary saw makes the process faster and easier, if you already have one.


Step 7 – Tape the Drywall
Once all drywall is hung, apply mesh tape to all of the drywall seams and attach corner bead to the corners with drywall screws.

Step 8 – Mud and Sand the Drywall
Apply joint compound liberally and smoothly to the drywall seams and corners. Let it completely dry for 24 hours before sanding smooth with an orbital sander and 100 grit sanding pad. Repeat the mudding process again with a second coat of joint compound followed by a 24-hour drying time and sanding again.

Step 9 – Prime
Once the drywall is sanded smooth, it’s time for the fun part! But first, it needs some grip. Roll on 1-2 coats of Romabio Microgrip Primer. Be sure to mix it with water using a mixer drill bit according to the instructions on the back of the canister.
We applied 2 coats of primer to cover the purple drywall better since the primer was very thin. Wait about a day for the primer to fully set before moving on to the Venetian Glaze step.


Step 10 – Apply Venetian Glaze
I highly recommend practicing the Venetian Glaze application process using a scrap piece of drywall first so you can get used to it.
We found it was easiest to apply the first coat of plaster paint with a brush on a 1-2 square foot section at a time and immediately move a clean trowel over top of the wet glaze in half-moon circular motion to create the textured plaster look. Hold the trowel as a slight angle as you move it over the glaze to control the pressure.
It does not have to be perfect AT ALL! Part of its beauty is its embracing of imperfection. It’s actually fun and a bit of an artistic process as you get the hang of it.


It’s best to apply 2-3 coats of the Venetian Glaze. You can also slightly dilute it with up to 5% water to create a little contrast and depth from the first coat.
We used the color Bianco White, so it’s difficult to see much contrast in such a light glaze. With Romabio’s darker colors, the variation and movement in the layered coats of glaze is much more noticeable.

Step 11 – Finish With a Top Coat
Once the Venetian Glaze plaster paint is completely dry, apply the Romabio Matte Clear Top Coat.

If we wanted to at this point, we could have just added a finishing trim to the top and bottom of the fireplace, placed the insert, and called it done. It’s a great minimalist fireplace idea if that’s your style.
If you wanted to skip the insert, you could just paint the interior black and make it a faux fireplace.
But we wanted to soften the minimalist modern fireplace look with a more intricate surround.

Step 12 – Build a DIY Fireplace Surround
We can’t at all take credit for thinking up this beautiful surround, so you can refer to Chelsey Feng’s DIY fireplace insert surround tutorial and Angela Rose’s DIY fireplace mantel and surround tutorial if you want to take this project a couple steps further.
We attached 1/2-inch x 2-inch trim to the crown and base of the fireplace with a brad nailer to finish it.

Step 13 – Apply Plaster Paint Method to Surround
After building, caulking, wood filling, and sanding the surround, we repeated the Venetian Glaze process on it.
We didn’t want to work around applying the glaze on the entire fireplace with the surround as an obstacle, so we chose to do the flat, plain fireplace first. There’s no right or wrong way if you want to glaze the entire fireplace unit.

Step 14 – Place the Insert
Once the fireplace was dry, we plugged in the electric fireplace insert, positioned it inside the niche, and sat back to enjoy it. I’m so surprised how real it looks! I love that it has glass doors and air curtains to make it look even more convincing.
We can turn it on without heat just to enjoy the look of a fire, since it’s so blazing hot outside. But in the cooler months, it has a low and high heater setting that pushes the hot air outward. It also has some convincing crackle sounds.

You could absolutely build a fireplace design like this in a living room, dining room, or bedroom too.
Can you believe this before and after?! I’ve wanted to do a DIY plaster fireplace out here for so long it almost makes me excited for fall and winter… almost. 😉 I’m still a summer girl through and through.


Have you ever built a DIY fireplace with an electric insert before? It’s totally do-able if you’re a DIY newbie, I swear.
More Home Improvement DIY Project Ideas
- How to Replace Stair Spindles – DIY Stair Makeover
- Inexpensive DIY Batten Wall Using Lattice Strips
- DIY Built In Bookshelves Using the IKEA Billy Bookcase Hack
- How to Convert Closets to Built-In Shelves
- How to Build a DIY Closest